2010
| Revision History | ||
|---|---|---|
| Revision 0e | 27.01.2010 | Christian Schoenebeck |
| Environment variable LINUXSAMPLER_PLUGIN_DIR was introduced to LinuxSsampler (chapter "live-editing"). | ||
| Revision 0d | 07.12.2007 | Christian Schoenebeck |
| Added screenshot of JSampler to chapter "live-editing". | ||
| Revision 0c | 07.10.2007 | Christian Schoenebeck |
| Added chapter about live-editing. | ||
| Revision 0b | 03.06.2007 | Alexander Methke |
| Restructuring, See Also, few hints on improvement (GUI) | ||
| Revision 0a | 28.05.2007 | Alexander Methke |
| Initial editing, basic GUI features, some information about GIG file structure. | ||
Table of Contents
List of Figures
- 1.1. Screenshot of the whole application
- 1.2. Screenshot of the new default group
- 1.3. Screenshot of the new dimension action
- 1.4. Screenshot after adding the sample
- 2.1. Selecting an instrument to edit from QSampler
- 2.2. Selecting an instrument to edit from JSampler "Fantasia" 0.8a
- 2.3. Gigedit running "attached" to LinuxSampler
- 3.1. Schematic drawing of basic signal routing
- 3.2. Screen shot of ADSR settings for Amp section
- 3.3. Screen shot of LFO settings for Amp section
- 3.4. Screen shot of general settings for Filter section
- 3.5. Screen shot of ADSR and LFO settings for Filter section
List of Tables
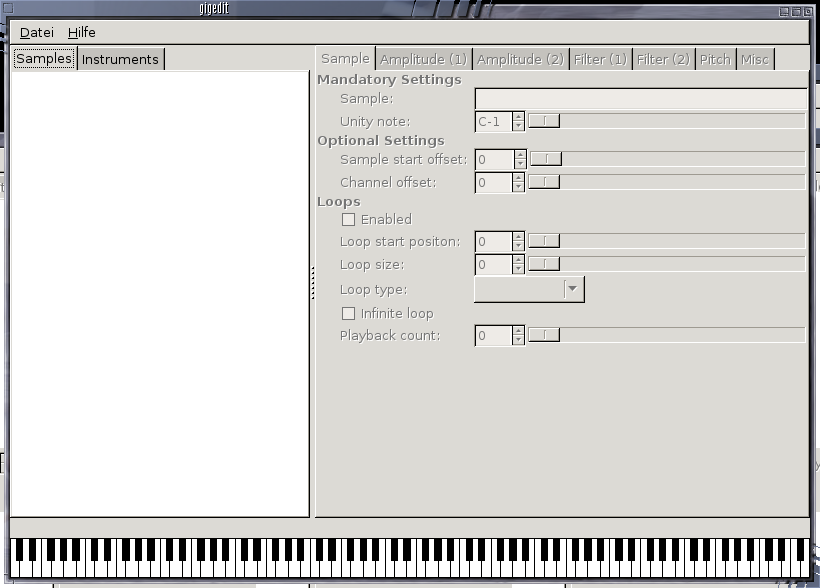
Now you have gigedit running and can see something like the following screenshot. On the left you see an empty white field, on the right a set of tabbed dialogs and below all that some piano keys. At this early stage everything is disabled, except the topmost menu.
In the next paragraphs you will add a few samples and stuff to create a totally new GIG file. If you're interested in some technical background and help on the terms used here, refere to Chapter 6, The GIG format.
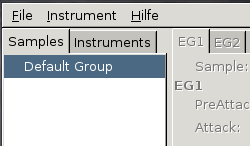
To start with a new file, we need a new file. Choose → and the only thing changing is an entry Default Group on the previously white field on the left.
Now there's a lot more possible on the gui and lacking such a fine quickstart I had to figure it out myself: Right click somewhere in the gray area above the piano keys. There's a small gray band and you'll get the following popup menu (Says: Add, the red arrows mark the area's width where you can cause this popup to pop up):
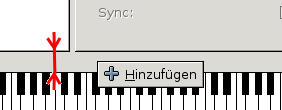
If you click this action a small rectangle occurs and some of the input fields and sliders on the tab EG1 are enabled. By moving the curser above the rectangle's left and right border you can resize it and define the region's width, e.g. it's lowest and highest key. Now you have a region and all you need is a sample, to play when pressing the region's keys.
Tip
Until the alpha version it was necessary to do it that way around instead of first adding a sample and then a region. It caused some additional dimensions to show up, which could not be removed.
Hopefully you have some WAV samples somewhere available on your computer. If not: get some from your microphone, the internet or a friend who knows, what a WAV is ;-). Select the entry on the left and right click it (or right click it twice, so that is enabled). And click . Browse with the file chooser through your harddisk and select a wav sample. If you did so, your Default Group will look like this (maybe you need to open the tree like structure by clicking the triangle in front).

On the left you see the popup menu, the added sample below, on the
right side the enabled input elements and below all that the
piano key roll with a blueish rectangle from C2 to C3. The
input field Sample says NULL.
That means our region has no sample assigned. I tried to enter
the sample's name, but that did not work. Drag and Drop is
the key: Drag the added sample onto the input field
Sample and the cursor changes. Drop
it and you'll see the name inside the field.
Weeeee, no you can save your changes with . When I wrote this quickstart the action did not show a file name dialog but an error. So save it and play with it. Load it into your sampler, perferrably LinuxSampler and hit the keys. But only in the region's range you'll here some noise...your sample.
If it did not work: check your equipment, hard- and software, maybe use some tools like gigdump or gigextract to verify, that the sample(s) are inside the gig file and it's structure is correct. Otherwise join the LinuxSampler's mailing list (http://www.linuxsampler.org/developers.html).
Table of Contents
So far we've been using gigedit as stand-alone application. The main drawback of this approach is that you cannot immediately hear the effect of your modifications unless you explicitly (re)load the respective instrument into a sampler, which is unconvenient and wastes a lot of time (especially with big instruments). Fortunately gigedit and LinuxSampler are friends and politely share the same instrument(s) at the same time if you tell them to do so.
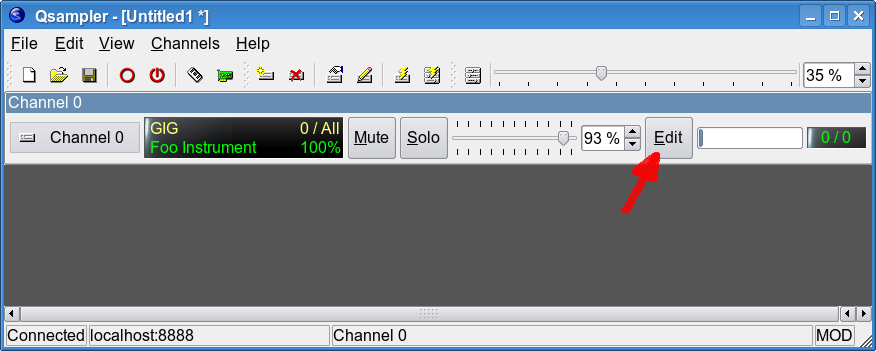
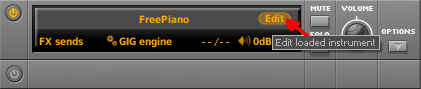
To do this, you first have to load the respective instrument(s) into LinuxSampler, i.e. by using a frontend application like JSampler or QSampler. Here's how you do it with QSampler: Select the channel strip of the instrument you want to edit and click on the "Edit" button on the same channel strip, like shown in Figure 2.1, “Selecting an instrument to edit from QSampler”. Alternatively you can also select this function from the menu ( → ). In any case gigedit should popup on the screen in less than 5 seconds. This time you can see gigedit like being "attached" to LinuxSampler.
In JSampler you won't see an "Edit" button
by default. Instead you have to move the mouse pointer over the channel
strip which contains the instrument you want to edit. The channel strip
display will change immediately and a round, small "Edit" button
appears like shown in Figure 2.2, “Selecting an instrument to edit from JSampler "Fantasia" 0.8a”. Click on
that button and gigedit will appear like with
QSampler, so it's pretty much the same thing.

If nothing appears on the screen or in case you get an error when clicking
on the "Edit" button, refer to the section called “Trouble with live-editing”.
All modifications you do on the selected instrument with gigedit will immediately be audible when you play notes. When you close gigedit you'll notice that it won't ask you to save the instrument, which it would usually do when you run gigedit as stand-alone application. This is because the modifications are not lost when you close it, at least not unless you kill the sampler as well. So when you click again on "Edit" you'll see that all the modifications you made are still there. Also note when selecting "New" or "Open" from the menu to create a completely new instrument or open another one from a file, gigedit will be "detached" from the sampler, that is the other instrument will not be audible with the sampler. This is currently (2007-10-07) a minor limitation of the sampler and gigedit. So if you want to create a completely new instrument from scratch you first have to create that instrument with gigedit, save it to a file and then load it into the sampler. After that you can continue like described in this chapter and edit the new instrument "live" by clicking on the respective "Edit" button in QSampler.
LinuxSampler and gigedit need to be compiled properly to be able to use the described "live editing" feature between those two applications. So here is a short technical explanation how the interaction between those two applications work: LinuxSampler per se doesn't actually know anything that an application like gigedit exists in this world. However the sampler provides a plugin system to extend it for this functionality. When you compile the sampler you define a directory where the sampler shall look for plugin DLLs to load on startup. So first check if that directory actually exists or if the sampler was not compiled with the correct / desired plugin directory. When you start the sampler from the console simply by typing the command linuxsampler and you see something like this:
bob@mybox ~ $ linuxsampler
LinuxSampler 0.4.0.7cvs
Copyright (C) 2003,2004 by Benno Senoner and Christian Schoenebeck
Copyright (C) 2005-2007 Christian Schoenebeck
Detected features: MMX SSE
Creating Sampler...OK
Registered sampler engines: 'GIG'
Registered MIDI input drivers: ALSA
Registered audio output drivers: ALSA,ARTS,JACK
Loading instrument editor plugins...Could not open instrument editor plugins directory (/usr/local/lib/linuxsampler/plugins): No such file or directory
Registered instrument editors:
Starting LSCP network server (0.0.0.0:8888)...OK
LinuxSampler initialization completed. :-)
Then there's definitely something wrong. :) So either create the mentioned directory (in this case "/usr/local/lib/linuxsampler/plugins") manually or in case you want to use another directory as plugins directory (and you have linuxsampler version 1.0.0.cvs3 or younger), you can simply override the location where LinuxSampler shall look for plugins by setting the environment variable LINUXSAMPLER_PLUGIN_DIR:
bob@mybox ~ $export LINUXSAMPLER_PLUGIN_DIR="/usr/lib/linuxsampler/plugins"bob@mybox ~ $linuxsampler
or recompile LinuxSampler with another directory as default plugins directory. Assuming you want it to use the directory "/usr/lib/linuxsampler/plugins" instead you could compile the sampler i.e. this way:
bob@mybox ~/cvs/linuxsampler $ ./configure --enable-plugin-dir=/usr/lib/linuxsampler/plugins && make
probably in conjunction with some other configure script parameters and some nice CXXFLAGS to optimize the sampler for your machine, but this is out of the scope of this document. After the compilation completed, you would install the sampler as user root as usual:
bob@mybox ~/cvs/linuxsampler $su Password:mybox linuxsampler #make install
Again make sure that your chosen plugin directory exists, if not create it and when running LinuxSampler now again, the error message on the console ("Could not open instrument editor plugins directory") should be gone.
Now you must recompile gigedit, because it has to compile the appropriate plugin and has to place that plugin DLL into the samplers plugins directory. It should look like this:
bob@mybox ~/cvs/gigedit $./configure checking build system type... i686-pc-linux-gnu checking host system type... i686-pc-linux-gnu checking for gcc... gcc checking for C compiler default output file name... a.out checking whether the C compiler works... yes checking whether we are cross compiling... no ... checking for gmsgfmt... /usr/bin/gmsgfmt checking for xgettext... /usr/bin/xgettext checking for pkg-config... /usr/bin/pkg-config checking pkg-config is at least version 0.9.0... yes checking for GTKMM... yes checking for GIG... yes checking for SNDFILE... yes checking for SF_INSTRUMENT.loops... yes checking for LINUXSAMPLER... yes Found linuxsampler 0.4.0.5cvs Retrieving LinuxSampler's plugin dir... /usr/lib/linuxsampler/plugins Relative plugin dir: ${libdir}/linuxsampler/plugins configure: creating ./config.status config.status: creating Makefile config.status: creating src/Makefile config.status: creating src/gigedit/Makefile config.status: creating src/plugin/Makefile config.status: creating po/Makefile.in config.status: creating debian/Makefile config.status: creating doc/Makefile config.status: creating doc/quickstart/Makefile config.status: creating config.h config.status: config.h is unchanged config.status: executing depfiles commands config.status: executing intltool commands config.status: executing default-1 commands config.status: executing po/stamp-it commandsbob@mybox ~/cvs/gigedit $make
Make sure the higlighted section of the configure script output looks similar like above. After compilation completed, you once again install with the common procedure:
bob@mybox ~/cvs/gigedit $su Password:mybox gigedit #make install
This will install the gigedit binary, as well as its plugin .so file into the directory "/usr/lib/linuxsampler/plugins" (or whatever you chose). And when you start the sampler now from the console, it should look like this:
bob@mybox ~ $ linuxsampler
LinuxSampler 0.4.0.7cvs
Copyright (C) 2003,2004 by Benno Senoner and Christian Schoenebeck
Copyright (C) 2005-2007 Christian Schoenebeck
Detected features: MMX SSE
Creating Sampler...OK
Registered sampler engines: 'GIG'
Registered MIDI input drivers: ALSA
Registered audio output drivers: ALSA,ARTS,JACK
Loading instrument editor plugins...OK
Registered instrument editors: 'gigedit'
Starting LSCP network server (0.0.0.0:8888)...OK
LinuxSampler initialization completed. :-)
Now you're done with setup and the steps described in the section called “Only trust what you hear...” should work for you. If not, you probably found a bug. Feel free to contact us via our mailing list or open a bug report on our website.
Note
If you just used precompiled binary packages of LinuxSampler and gigedit, i.e. from the Linux distribution of your choice, you shouldn't have to recompile them by yourself. Either the versions of LinuxSampler and / or gigedit are too old or they were simply not compiled / packaged correctly. In both cases, please report it to the respective package maintainer of your distribution!
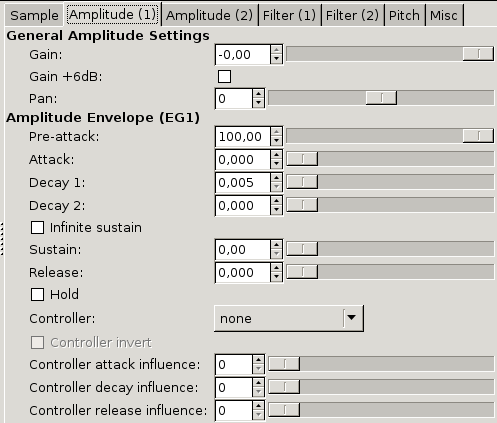
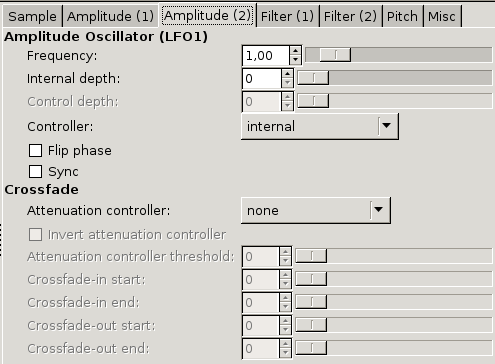
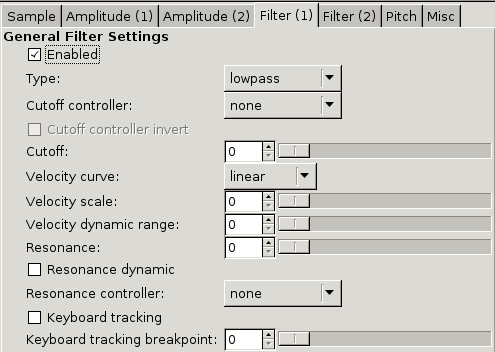
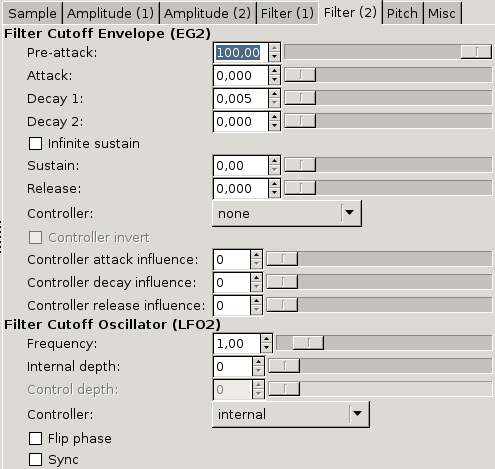
Now that you've tried enough you want to know what all the funny elements like Attack or LFO mean. I don't need to explain it here, look up the terms in a textbook. If you can explain the difference between Amplifier (Amp) and Voltage Controlled Filter (VCF) you can go on looking on the next picture:
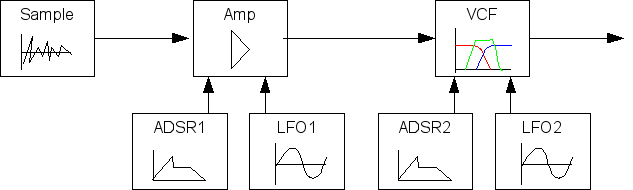
As you can see you have access to an Amp and one VCF. This is not much from a synthesizer's point of view, but enough if your samples are already perfectly synthesized. Gigedit provides for 4 tabs, one for each section (Amp/VCF) and one for the LFO and the ADSR.
First sampler use was just repeating a sound, a drum sample, some vocals, maybe short snippets of whole orchestrations. This so called Sample Bank is a collection of samples, vocals, or sounds that will never be stretched along a key range. You simply press a key and the sound occurs as it is. So there won't be no LFO nor ADSR influence. Regions will range only for one key, maybe include the half tone, maybe not. For drum maps I personally recommend the Appendix A, General Midi Drum Map. If you have different drum sets you may switch easily between them without reprogramming your sequencer. Also shifting by octaves is easy to change the drums.
Table of Contents
- Bugs: http://bugs.linuxsampler.org
- More Documentation (incl. some diagrams): http://stud.fh-heilbronn.de/~cschoene/projects/libgig/
Table of Contents
Allthoug this is only a quickstart somebody might want to know more about the GIG format and all that Regions, Dimensions, Samples and stuff. GIG is an abbreviation of Gigasampler a format defined by some company to hold lots of data about noise. Samplers are able to morph a (MIDI-) key event into a sound. Either they just play a so called sample, or change it according to the key's note, maybe shift it, do something with filters or oscillators.
To describe all that you have the GIG-format. It contains not only the samples but also where they're situated on the keyboard, their basic tuning and lots of controlling information like aftertouch, modwheel and so on. This rather complex information is split into different parts.
A region is a range of notes or keys. For example one could have a bass drum sample and assigns it to a single key, let's assume C4 for that. So when the GIG-file contains that region, ranging from C4 to C4 (one key) and referring to the base drum sample. If you load this file into your sampler and press C4 you hear it kicking.
Kicking the bass drum is not really a complicated use case. Imagine a more sophisticated piano sample. You can play it hard or soft, higher or lower notes and even press various pedals. That's the dimension's task. You take various samples (soft, hard, this pedal, that pedal) and get, let's say 4 different sample types of a 2-octave range.
First you create a region ranging from C2 to C4. But you get only one sample into this region. A dimension adds additional dimensions to this. A region with another dimension splitting into 2 bits gives you 4 more samples (2^2). Now how will the right sample be selected? First of all there's the region information, you already pressed a key. The sampler just asks the dimension, which controller it belongs to, checks this controller's setting and chooses the sample from the according dimension.
A
- ADSR
Attack, Decay, Sustain, Release, abbreviation for the so called ADSR-envelope that forms a shape which controls voltage controlled circuits like amplifiers or filters.
- Attack
time value, time span defined for an envelope to rise after starting the envelope cycle
See Also ADSR.
D
- Decay
time value, time span defined for an envelope to fall after rising to a hold state
See Also ADSR.
E
- Envelope
Definition of time and level values to shape a signal. Most common structure is a so called ADSR-follower. Such an envelope has a rising Attack-time, a first falling Decay time leading to the Sustain level. At the end of the cycle there's a Release time, damping the signal's strength. For example a piano has a rather short Attack time, no Sustain level and a Release time. Strings have varying Attack times as well as varying Decay, they have a Sustain level and very flexible Release time.
See Also ADSR.
L
R
- Release
time value, time span defined for an envelope to fall at the end of an envelope cycle
See Also ADSR.
S
- Sustain
strength or level value, level of an envelope while being in hold state of an envelope cycle
See Also ADSR.
V
- VCA
Voltage Controlled Amplifier, an amplifier whose amplification depends on a controlling voltage. Instead of making it louder by turning a knob you raise the controlling voltage. Often used in conjunction with Envelopes or LFOs to shape a signal.
- VCF
Voltage Controlled Filter, a filter whose parameters, for example cutoff frequency, depend on a controlling voltage. Instead of changing the frequency by turning a knob you raise the controlling voltage. Often used in conjunction with Envelopes or LFOs to shape a signal.
Drums are not played with notes but with events. You trigger the drum or you don't trigger it. But there's no such range thing like a piano has or strings or synths. Back in the 1980s some people thought, it would be good to have something like a drum map. Switching from a piano to strings only needs some adjustment in octaves but notes sound the same. Switching from one drum set to another could cause a mess or silence. Without a standardized assignment of note (events) and drums it's quite hard to move from a jazzy drum set with brushes to a more straightforward rock drum set.
Table A.1. General midi drum map
| Note | Drum Sound | Note | Drum Sound |
|---|---|---|---|
| 35 | Acoustic Bass Drum | 59 | Ride Cymbal 2 |
| 36 | Bass Drum 1 | 60 | Hi Bongo |
| 37 | Side Stick | 61 | Low Bongo |
| 38 | Acoustic Snare | 62 | Mute Hi Conga |
| 39 | Hand Clap | 63 | Open Hi Conga |
| 40 | Electric Snare | 64 | Low Conga |
| 41 | Low Floor Tom | 65 | High Timbale |
| 42 | Closed Hi-Hat | 66 | Low Timbale |
| 43 | High Floor Tom | 67 | High Agogo |
| 44 | Pedal Hi-Hat | 68 | Low Agogo |
| 45 | Low Tom | 69 | Cabasa |
| 46 | Open Hi-Hat | 70 | Maracas |
| 47 | Low-Mid Tom | 71 | Short Whistle |
| 48 | Hi-Mid Tom | 72 | Long Whistle |
| 49 | Crash Cymbal 1 | 73 | Short Guiro |
| 50 | High Tom | 74 | Long Guiro |
| 51 | Ride Cymbal 1 | 75 | Claves |
| 52 | Chinese Cymbal | 76 | Hi Wood Block |
| 53 | Ride Bell | 77 | Low Wood Block |
| 54 | Tambourine | 78 | Mute Cuica |
| 55 | Splash Cymbal | 79 | Open Cuica |
| 56 | Cowbell | 80 | Mute Triangle |
| 57 | Crash Cymbal 2 | 81 | Open Triangle |
| 58 | Vibraslap |
The Appendix A, General Midi Drum Map is a quite generic approach to arrange drum samples. The most impressive realization was the MC 505 drum map. It doesn't lack all those fine exotic samples and is a bit more intuitive. Have a look at the octave shifting bass drum switching...
Table B.1. MC505 midi drum map
| Note | Drum Sound | Note | Drum Sound |
|---|---|---|---|
| 35 | Bass Drum 1 | 59 | Tom |
| 36 | Bass Drum 2 | 60 | Tom |
| 37 | Side Stick | 61 | Crash/ Cym |
| 38 | Snare 1 | 62 | Tom |
| 39 | Hand Clap | 63 | Ride/ Cym |
| 40 | Snare 2 | 64 | Crash/ Cym |
| 41 | Low Floor Tom | 65 | Ride |
| 42 | Closed Hi-Hat | 66 | Tambourine |
| 43 | High Floor Tom | 67 | Crash |
| 44 | Pedal Hi-Hat | 68 | Cowbell |
| 45 | Low Tom | 69 | Cymbal/ Crash/ Ride |
| 46 | Open Hi-Hat | 70 | Guiro/ Cowbell/ Hi Bongo |
| 47 | Bass Drum 3 | 71 | Ride |
| 48 | Bass Drum 4 | 72 | High Bongo |
| 49 | Sidestick (Rim) | 73 | Low Bongo/ Conga |
| 50 | Snare 3 | 74 | (High) Conga |
| 51 | Clap | 75 | (High) Conga |
| 52 | Snare 4 | 76 | (Low) Conga |
| 53 | Tom | 77 | High Timbale |
| 54 | Closed High Hat | 78 | Low Timbale |
| 55 | Tom | 79 | Agogo |
| 56 | Open High Hat | 80 | Agogo/ Claves |
| 57 | Tom | 81 | Cabase/ Guiro |
| 58 | Open High Hat |
Table B.2. MC505 midi drum map (continued)
| Note | Drum Sound | Note | Drum Sound |
|---|---|---|---|
| 82 | Maracas | 91 | Synthetic Sample |
| 83 | Hit/ EFX Sample | 92 | EFX Sample |
| 84 | Blip/ EFX Sample | 93 | Noise Sample |
| 85 | Hit/ Blip | 94 | Clap |
| 86 | Hit/ Noise Sample | 95 | Bass Drum |
| 87 | EFX Sample | 96 | Bass Drum |
| 88 | Hit | 97 | Snare |
| 89 | EFX Sample | 98 | Snare/ Rim |
| 90 | EFX Sample |
G
- GIG, An Overview
S
- Sample Bank, A simple Sample Bank